Make your own Five Marys beeswax wraps
This article was originally published in September 2022
At Five Marys Farms in Northern California, Mary and Brian Heffernan raise cattle, sheep and hogs—along with raising a family. With four daughters, life is full of chores and responsibilities on the 1,800-acre ranch, but there’s also plenty of joy and fun. The “Five Marys Family Style” cookbook (Sasquatch Books, $40), by Mary Heffernan and Seattle author Jess Thomson, shares their hearty homey recipes, seasonal stories and traditions, plus cool DIY projects. These beeswax wraps from the book are a great way to cut down on plastics use for back-to-school lunchboxes, or get started on homemade holiday gifts.
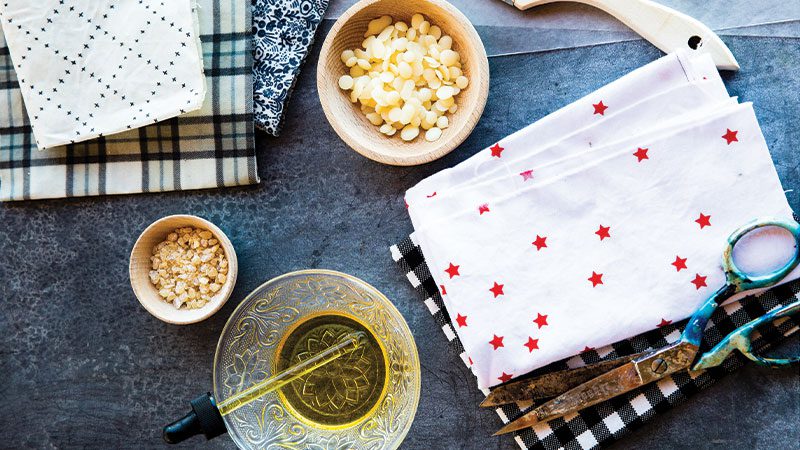
THERE’S NOT A LOT OF IRONING done around the ranch, but when I do use something besides a branding iron, it’s because I’m making beeswax wraps, which are reusable covers for leftovers, sandwiches, and whatever else might need plastic bags or wrap. Made by painting a mixture of beeswax, pine resin and jojoba oil onto cotton fabric, then ironing it in so that the fabric soaks up the mixture, the wraps become waterproof and tacky enough to stick to themselves. They’re a fun family project, and when you have them on hand, you use a lot less plastic and aluminum foil. I make big rounds (about 2 inches larger in diameter than my dinner plates) for storing leftovers, 13-inch squares for wrapping sandwiches, and other various sizes for topping that half-eaten bowl of yogurt, storing the hunk of onion I didn’t use, or covering the leftover sauce I can’t bear to throw out.
This project makes enough wraps for two kitchens—which means it’s perfect if you have a gift to give or if you want to tackle the process with a friend. Start by choosing your fabric, which must be 100 percent cotton to soak up the wax properly, then source the remaining ingredients online. Note that anything that touches the wax, including the bowl you put the wax in and whatever you use to stir the wax mixture, shouldn’t be precious, because the mixture is extremely difficult to remove once it dries.
To use the wraps, simply fold them over the top of a plate or bowl, or around a sandwich (they’re great for catching drips as you eat!), and the heat from your hands makes the layers of the wrap stick together. But since they need to be washed with cold water so the wax doesn’t melt, it’s best not to use them to store raw meat.
Note that the combination of wrap sizes below can be cut from two 1-yard pieces of fabric, but if you use smaller fabric pieces, you may not be able to get all 18 wraps out of them. Either plan your cuts first to be most efficient or buy a little extra fabric just in case. Or only make the sizes that appeal to you most.
Makes at least 18 assorted-size wraps: four 8-inch squares; four 9-inch squares; four 13-inch squares; two 8-inch rounds; two 12-inch rounds; two 11-by-15-inch rectangles.
• 2 cups beeswax pellets
• ⅔ cup pine resin powder or crushed pine resin chunks
• 2 teaspoons jojoba oil
• Old mixing bowl
• Medium saucepan
• Old rubber spatula or wooden spoon
• Parchment paper
• Old towel
• Iron
• Trivet or pot holder
• About 2 yards 36-inch-wide assorted 100 percent cotton fabric, washed and dried, trimmed, and cut into desired sizes
• New 2-inch paintbrush (a wooden “chip brush” is fine)
• Olive oil and paper towel, for cleaning
• Scissors
( PCC stocks beeswax pellets and jojoba oil, while pine resin powder is available online.)
First, make the beeswax mixture: Put the pellets, pine resin and jojoba oil in a medium mixing bowl set over a medium saucepan with an inch or so of water in the bottom; the base of the bowl should hover above the water. Place this makeshift double boiler over medium-low heat and cook, stirring frequently with a spatula you don’t mind forever donating to this type of project, until the beeswax and resin have melted completely and the mixture is clear, 15 to 20 minutes, adjusting the heat as needed so the water maintains a bare simmer. (You’ll notice the wax melts before the resin; keep cooking until the resin has melted completely and no longer forms swirls in the beeswax.) Note that you’ll need to either leave the spoon in the bowl as you go or set it on a piece of parchment paper; you don’t want to put the hot wax mixture directly on your kitchen counter.
While the mixture melts, set up the waxing station: Fold an old towel in halves or quarters so it covers a stretch of counter (or better yet, a craft table) about 3 feet by 2 feet. Tear off two 2-footlong pieces of parchment paper and place them on the towel, then tear off four more similar sheets. Place two of the sheets aside, then place two of the sheets on another flat surface, like the counter or the floor, if your kitchen is filling up. (This is where the wax wraps will dry.) Empty the iron of any water, turn off the steam function, and heat to the “high” or “cotton” setting.
Once the wax mixture has melted completely, carefully transfer the double boiler to a trivet or pot holder beside the towel. (The hot water below will keep the wax nice and runny as you work.) Set one of the smaller fabric pieces on top of one of the pieces of parchment on the towel. Dip a clean paintbrush in the wax mixture and paint a thin layer over the entire surface of the fabric, taking care to get the wax all the way to the edges. Top with the second piece of parchment, aligning the layers so no wax creeps out of the parchment (and onto your iron!), and iron thoroughly until you see that the moisture of the wax has melted into the fabric. Carefully remove the top piece of parchment and set it aside, sticky side up, then carefully peel the fabric off the bottom piece of parchment. Wave the fabric around for a moment to cool, then transfer the wax wrap to one of the reserved pieces of parchment to dry. Repeat with the remaining fabric and wax, replacing the top piece of parchment with one of the extras partway through the process if it gets wax on the top side. (You don’t want any wax touching the iron.) Starting with smaller fabric pieces and working up toward larger pieces allows the extra wax on the parchment to be incorporated into new pieces as you go. While you work, you can stack the cooled dry wax wraps somewhere else to make room for new hot wraps on the drying area.
You may wind up with a little of the wax mixture on your fingertips—it comes off easily, but not with water. To remove it, try moistening a paper towel with olive oil and use it to rub off the wax. The same works with any accidental spills!
Once all the wraps are dry, trim away any wayward strings with scissors. The wraps look best as gifts when they’re still flat, folded neatly, or rolled together in little bundles and tied with string, but to activate the wax in the wraps and make them effectively tacky, you’ll need to scrunch and unscrunch each wrap a few times before using—the heat of your hands will allow them to become sticky like plastic wrap.
Tips and tricks
- The wax will tint your fabrics a slightly darker shade, so pick colors and patterns that will look good a bit darker.
- If you notice the wax mixture seems to be thickening over time, return the double boiler to low heat and bring the water back to a simmer, then stir for a few minutes, until the mixture thins, and resume your work. (You can also stop mid-project and allow the wax to cool in the bowl, then simply reheat it until liquefied when you’re ready to start again.)
- If there are a few wax wraps that seem particularly thick or sticky, transfer some of their wax to another (new) wrap: First, place a fresh piece of fabric between two completed wax wraps. Arrange the fabric sandwich between two pieces of parchment paper, without brushing on additional wax, and iron. The extra wax will transfer to the new fabric. This time, transfer the top and bottom wraps to parchment to dry, and check to make sure the middle layer is completely waxed (and doesn’t show any dry spots). Transfer to parchment to cool, or brush any dry spots with additional wax (or rearrange the fabrics and repeat), re-iron, and let dry. Wax wraps work with a lot less wax than you might think, so following this method will allow you to make more wraps.
- If you want to make wax wraps with pieces of fabric larger than your parchment, fold them in half and iron them folded—the wax still seeps through all of the layers. Make sure there are no dry spots at the fold when you open the wraps.
- Store the wraps at room temperature.
- Wash the wraps in cool or room temperature water with a sponge and regular dish soap, and hang to dry. Always wash your wraps with cold water; hot water will melt or deform the wax.
- As the wraps age with use, you might find their stickiness fades. To renew them, simply layer between parchment, re-iron and cool as instructed, and they’ll be good as new!

©2022 by Mary Heffernan. Excerpted from “Five Marys Family Style: Recipes and Traditions from the Ranch” by permission of Sasquatch Books.