How to make great bagels—fast!
By Nancy Leson, guest contributor
This article was originally published in September 2020

As a curious cook and a passionate practitioner, I’ve preached the gospel of bread baking for decades, first as food writer for The Seattle Times, later on KNKX radio’s “Food for Thought” and—since 2016—as a PCC cooking instructor.
So trust me when I say this: When it comes to determining who makes the best bagels, there is only one answer: You!
In the world according to me, the best bagels are hand formed, boiled, baked and eaten when still (slightly) warm from the oven. And contrary to popular belief, this can be accomplished in your home kitchen in little more than an hour.
“Not so fast!” you say, arguing that any bagel worthy of the name must first spend the night in the fridge. Well, that’s the conventional wisdom.
“Believe me,” writes nationally renowned baking guru Peter Reinhart in his award-winning cookbook, “The Bread Baker’s Apprentice,” “It is impossible, in my opinion, to make a decent bagel without the overnight method.”
Believe me, and the scores of students I’ve converted: With all due respect, that’s poppy(seed)cock!
Not that I don’t agree with Reinhart when he insists, “You will never achieve a legendary bagel without the benefits of a long, slow, cold fermentation.” But somewhere between the legendary and the Lender’s is a handmade bagel to be proud of.
Like Reinhart, I grew up in a Jewish neighborhood in Philadelphia, appreciating the finer qualities of a classic bakeshop bagel. It doesn’t take much to evoke memories of those legendary dense and chewy rounds, prepared in the steamy confines of my family’s favorite bagelry, Brooklyn Bagels (even in Philadelphia, we bowed to New York when it came to the Hole-y Ones).
Next door, at Abe’s & Son Appetizers, we’d buy cream cheese and salty belly lox, sliced with surgical precision by white-aproned “certified loxologists” whose tongues stood firmly in cheek—and even more firmly, were stacked next to the pastrami in their deli case.
Oh, those Saturday night deli dinners at my grandparents’ house, where I recall my bubbie Rose, standing in her tiny kitchen boiling egg bagels, a specialty rarely seen these days. Sadly, I cannot envision myself at her elbow—because I was too busy watching “All in the Family” in her living room.
Instead, I learned to make bagels from my pal Mike, a Mercer Island mensch who agreed several years ago—after I’d tasted his homemade bagels—to school me in the art.
Never has that lesson been more important than during the early throes of the pandemic, when, like so many others, I found myself shopping less and baking more.
Fortunately, my kitchen is always well stocked with ingredients for bread making. But if you think I failed to join the ranks of bakers who hoarded ingredients at the start of the pandemic, think again.
When, post-shutdown, a friend offered to use her professional credentials to hit up a local wholesaler, I placed an order for 10 pounds of all-purpose flour and three 5-pound boxes of Diamond kosher salt. When another texted “You need yeast?” I replied with a text-screamed “YES!”—despite having a year’s supply in my freezer. And when the tulips brought color to the Skagit Valley, I drove straight past them to Cairnspring Mills, having prepaid online for a 50-pound bag of locally grown high-protein bread flour, delivered via drive-through, contact-free, straight into the trunk of my car.
Once stocked up, I shared the wealth, making certain everyone I knew had the means to bake. Then I upped my game when PCC pivoted from in-house to online cooking classes, offering to teach folks how to make one-hour bagels from the comfort of my kitchen. Within weeks, I was teaching sold-out demo classes and rejoicing, later, when my students emailed photos of their handmade creations.
Some of those bagels sported “stretch marks” (as one student described the imperfect lines that appeared after she sliced the dough into portions—but failed to roll it to a perfect smoothness). Another sent hers along with a query about their flippity ends (remedied by carefully sealing the overlap when gently rolling the dough-ends under your palm and, failing that, ensuring the bagel gets baked “flip”-side down).
I assure my students, as I assure you, that bagel shaping is an art, and perfection unimportant. Whether misshapen or a masterpiece, once seeded, schmeared and eaten, I promise: you won’t care what that bagel looked like.
Though I favor a mix of poppy- and sesame seeds and prefer to press my bagels directly into those seeds on both sides, you can top yours with a mere sprinkle, or a take a page from my husband (who likes Maldon salt and fresh ground pepper on his); or my son (Middle Eastern za’taar); or a you-do-you mix of shredded cheese.
And while I draw a line at blueberry bagels (sue me), you may indeed use my recipe to make cinnamon raisin bagels: Add an extra tablespoon of sugar plus a tablespoon of ground cinnamon to the dried ingredients, then incorporate 1 ½ cups of raisins during the last few minutes of the dough-making process.
Of course, you don’t have to make my one-hour bagels in an hour. Instead, why not split the difference?
Divide the dough in half, then form, boil and bake off half a dozen. Next, shape the other six bagels, place them on a spray-oiled baking sheet covered loosely with plastic, and refrigerate overnight before proceeding with the boil-and-bake. Fresh today. Fresh tomorrow. What could be better?
Well, homemade bagels with homemade lox. But that’s another story.
Nancy Leson’s One-hour Bagels
Makes 12 bagels
Total preparation time: Just over 1 hour
3 ⅔ cups (550 grams) bread flour (see note)
2 ½ teaspoons active dry yeast
2 ½ teaspoons kosher salt
1 tablespoon sugar
1 tablespoon canola (or vegetable) oil
10 to 12 ounces (1¼ to 1½ cups) warm water (110° F)
2 tablespoons baking soda (for boiling the bagels)
Optional garnish: poppy seeds, sesame seeds, Maldon or other coarse sea salt, etc.
Equipment:
Standing mixer (or a large bowl and a sturdy spoon)
Whisk
2 rimmed baking sheets: one fitted with a wire rack, the other with parchment paper
Large soup pot for boiling water
Perforated ladle or wire skimmer
For the dough:
If using a standing mixer: Fit the mixer with a dough hook. To the bowl of the mixer, add the flour, yeast, salt and sugar. Whisk the dried ingredients together. Turn the mixer onto its lowest speed. Add the oil, then drizzle ONLY 10 ounces of the warm water down the side of the bowl. Watch until the flour is completely incorporated, using the additional 2 ounces of water only if you need it to create a “clean” bowl. The dough will climb the hook. Kick the mixer up to its next speed and continue to mix for 7 minutes.
To mix by hand: Add the flour, yeast, salt and sugar then whisk the dried ingredients together. Stir in the oil and ONLY 10 ounces of the warm water. Stir until the flour is completely incorporated, eventually trading the spoon for your hands. Use the additional 2 ounces of water only if you need it to create a “clean” bowl. Once you can gather the dough into a ball, remove it to a flat surface and knead until smooth for at least 10 minutes.
Shape the dough into a ball, put it back into the mixing bowl and cover tightly.
Let dough rest/rise for 20 minutes. Meanwhile, preheat oven to 425° F and bring a large pot of water to a boil with 2 tablespoons baking soda.
To shape the bagels: Once risen, knead the dough briefly on an un-floured board, then roll the dough—which should feel springy to your touch—into a 16-inch log. Cut the log in half then cut each half into 6 pieces. Roll each piece into an 8-inch “snake,” then form a bagel by overlapping the ends by an inch or so, putting 4 fingers through the hole and gently rolling the overlap to create a circle. Conversely, you can poke your thumb through the middle of the dough then spin it on your index fingers for a few seconds to form the bagel: Your call!
To boil and bake: If you plan to seed your bagels, place a generous amount of seeds on a small plate and have this at the ready.
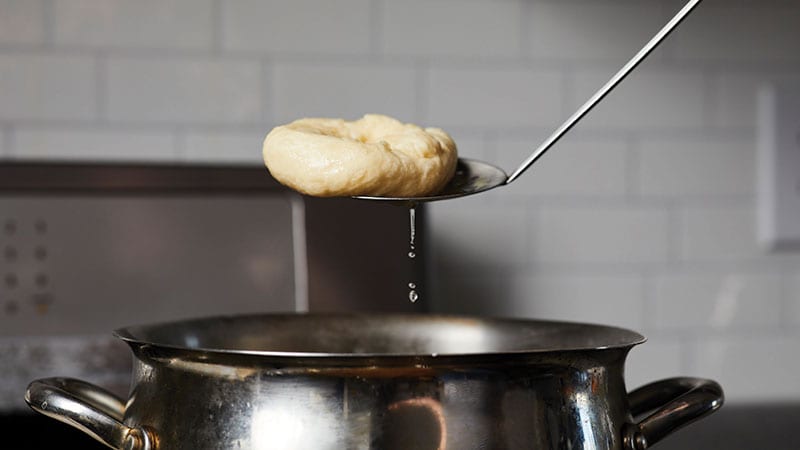
Boil in 3 batches (4 bagels each). They should float immediately. Boil for 15 seconds, flip and boil for another 15 seconds (for a total of 30 seconds), then using the ladle/skimmer, remove to the wire rack to briefly drip dry. This is when you’ll do the (optional) seeding: As soon as you can stand to handle the hot/wet bagels, swiftly press each side (or one side, you decide!) into the seeds.
Place bagels on the parchment-covered baking sheet and bake until golden-brown (20 to 25 minutes). Cool before serving.
Note: If you can get your hands on high-gluten flour, such as King Arthur Sir Lancelot (14% protein), by all means substitute it for “regular” bread flour. Another great option: sub-in 2 tablespoons Vital Wheat Gluten (such as Bob’s Red Mill at 75% to 80% protein) for two tablespoons bread flour.
Recipe by Nancy Leson
Click here to view Nancy Leson’s upcoming classes at PCC.