Canning 101: A beginner’s guide to preserving summer
By Sheryl Wiser, guest contributor

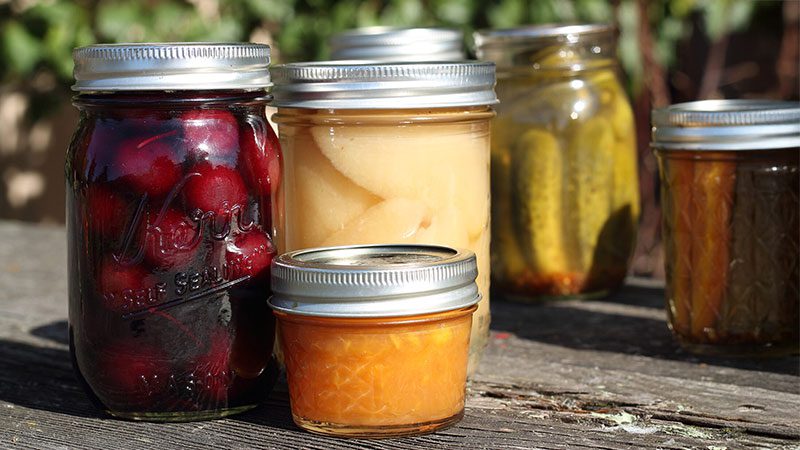
Interested in learning to can fruits and vegetables? You’re not alone — and there are several sweet rewards to home preservation.
Why should you can at home?
Canning allows you to choose recipes that most appeal to your own tastes and dietary preferences. Home canning also lets you control the exact ingredients going into your food — potentially right down to the field where the fruit was picked — and to use them at their ripest heights. The benefits are both gratifying and practical:
“The ability to preserve your own food and have a supply at home helps insulate yourself from issues in the supply chain,” said Stephanie Smith, statewide Consumer Food Safety Specialist with Washington State University’s School of Food Science. Food preservation can also help prevent food waste, support local economies by purchasing food from local farms and farmers’ markets, and give you year-round access to seasonal food, she said.
Not only does home preservation help control where our food comes from, said Carey Thornton of the Tilth Alliance, it can potentially save money. That’s especially true if you grow a garden, visit U-Picks, have access to case discounts, purchase seconds from a farm, or simply have more in your CSA than you can eat. Thornton also champions utilizing fruit from Seattle’s many abandoned apple trees. “Learning to make and can applesauce is a great way to utilize this abundant resource.”
The urge to preserve dates back to 1795 when a young French military officer known as Napoleon Bonaparte, looking for a way to preserve food for the troops, offered a reward of 12 thousand francs for the invention of a new food preservation method. Fast forward to the 1800’s when American tinsmith John L. Mason patented the now-ubiquitous Mason jar, which ultimately replaced messy and imperfect wax seals with a screwtop lid and rubber ring. The rest is canning history, peaking in 1943 when more than four billion cans and jars were processed, before refrigerators became standard features in American kitchens. Canning became popular again during the COVID-19 pandemic due to food supply issues and empty shelves, said Smith.
How to can safely
Canning may sound mysterious, but it’s a straightforward concept. As Ball’s Canning 101 website puts it, canning is simply the processing of food in closed glass canning jars at high temperatures. The heat interrupts natural spoilage by destroying food contaminants and, at the same time, removes air from the canning jars. As the jars cool, a vacuum seal forms that prevents new contaminants from getting inside. Individual recipes should provide specific details such as how much space to leave in the filled jars and how long the jars should be processed — this depends on factors that include what you’re canning, the size of your jars and whether you’re at high altitudes.
There are two types of canning — water bath canning and pressure canning. Water bath canning, which we focus on in this article, involves filling clean canning jars with hot preserves, putting on canning lids and bands, then submerging the filled jars in a large pot of boiling water for a predetermined amount of time to sterilize the contents and create a seal. Water bath canning is ideal for acid or high-acid foods that have a pH of 4.6 or lower. This typically includes fruits, pickles, sauerkraut, jams, jellies, marmalades, and fruit butters. This type of canning requires few (if any) specialized supplies.
Pressure canning uses a piece of equipment called a pressure canner, which harnesses the power of steam to heat contents to higher temperatures than can be achieved in water bath canning. These higher temperatures — and, therefore pressure canning — are required to safely preserve low-acid foods, including red meats, seafood, poultry, milk, and all fresh vegetables except for most tomatoes. Low-acid foods are the most common source of botulism outbreaks linked to home canning, according to the Centers for Disease Control. We do not recommend pressure canning as your first introduction to canning.
One of the biggest challenges for beginners, says local cooking instructor Nadia Tommalieh, is making sure food is properly preserved and safe to eat, and she calls water bath canning “a great and approachable place to begin.” Because canning does take time, she suggests starting small rather than taking on big batches until you get comfortable with equipment and technique. There are even “small batch” recipes that produce just a pint or two of preserves.
Don’t stray from science or safety, says Smith, who strongly encourages home canners to obtain canning information only from sources that have conducted research to ensure the safety of the recipe. These sources include WSU County Extension offices and websites. Also, the National Center for Home Food Preservation (NCHFP) at the University of Georgia is a particularly comprehensive and easy-to-navigate resource for beginners and pros, with plenty of general canning information for everything from cooling jars to selecting the correct processing time.
Home cooks are generally accustomed to adjusting recipes and cooking times to taste, but should resist that impulse when canning. Such changes can interfere with safety in the form of your recipe’s pH and the sterilization process.
“People do not understand just how much science is behind canning food,” reminds Smith. “There are many books, websites, and social media sources that do not have the scientific background to ensure that home-canned food recipes are safe and will not support the growth of Clostridium botulinum, the bacterium that produces the toxin that causes botulism. I’ve even seen canning books written by chefs that contained alarmingly dangerous information.”
For reliable and safe recipes, Thornton and many others recommend the classic Ball Blue Book, along with other Ball canning books and the Ball website, which also offers low sugar and/or alternative sugar recipes. Note that even those who prefer using the natural pectin in many fruits to “set” preserves may need to use a specific added pectin to achieve the proper consistency in low-sugar recipes. (Thornton recommends Pomona’s Universal Pectin for low-sugar recipes.)
Blue Book tip — the guide was first published in 1909 and has gone through many editions; make sure you are using the most current version (2024 as of this writing). “The research-based resources with tested recipes for canning are short. It’s always best to have the most current version of publications recommended to ensure safety,” said Susie Craig, a food safety expert and professor at Washington State University Extension. Those wishing for a deeper dive into food safety can check out Craig’s informative podcast Safety in a Minute.

What equipment is best for home canning?
Other than ingredients, canning requires some basic equipment to ensure safety, ease and cleanliness. For water bath canning, start with a heavy-bottom pot or copper pot.
In order to keep the filled jars from rattling and breaking in the boiling water, the jars are typically placed on a canning rack. Tommalieh prefers using a stainless-steel canning rack or an enamel-coated canner with a metal rack, which can feel sturdier and more reliable than plastic. (Avoiding plastic is generally preferred given questions about microplastics in food and concerns about plastic waste.)
Whatever type of pot you use, make sure it’s wide enough to fit your canning rack/basket and deep enough so you can submerge sealed jars by at least an inch of water. Thornton also suggests borrowing canners from nearby tool libraries.
Useful but optional tools include a wide mouth funnel and a ladle (preferably stainless steel) for getting hot preserves more easily into jars, plus a jar lifter, which is especially designed to lift hot jars into and out of the water bath. Especially handy is a magnetic lid wand, useful for picking up lids and settling them on the filled jars, and a scale for weighing ingredients. Also, treat yourself to a new wooden spoon for making sweet preserves to avoid the off flavors that may come from one that previously stirred garlic or onions.
Smith’s favorite is a canning bubble remover or “popper,” used to run around the inside edge of a filled jar to gently shift the food and release any trapped air bubbles. This helps ensure proper headspace — the space between the jar’s lid and the top of the preserves, which is needed for a proper seal — and a tight vacuum seal during processing.
Can you reuse canning jars?
When it comes to jars, bands and lids, Smith, Craig and Thornton advise only using regular Mason-type canning jars rather than repurposing items like glass spaghetti sauce or mayonnaise containers. Canning jars are specifically made to withstand the canning process, and canning recipes were developed using their standard sizes. With lids, always opt for two-piece canning lids which include a screw band and lid.
You can reuse Mason-type canning jars, says Smith, as long as the lid sealing surface is smooth and there are no chips, scratches or cracks. (Thornton says to avoid very old or vintage jars, as the glass may not hold up to the heating process.) Check carefully for these flaws whenever you’re reusing jars, because not only is it disappointing to have a jar break during the canning process, it’s not fun to fish pieces of glass out of your canning rack.
Screw bands can also be reused as long as they are not damaged or rusty; for recycling, check with Seattle Public Utilities on current guidelines. However, do not reuse canning lids. Smith notes the lids are not recyclable because they contain nonrecyclable components, but can be cleaned and used for non-canning purposes such as dry or refrigerated food storage.
Ripe and Ready
Canning is a year-round affair, but preserving the peak of the harvest is ideal. Having a dab of golden apricot jam on your toast in the middle of January will quite literally feel like a burst of warm sunshine.
In order to lock in all the best elements of taste, preserving food at its peak quality, within a day of purchase is key. The moment a fruit or vegetable is harvested, says Thornton, it starts to deteriorate and lose nutrients. “The point of food preservation is to keep that food usable and nutritious for as long as possible, so why wait?”
Another reason is keeping unwanted microorganisms at bay, says Smith. “As food sits, its quality will deteriorate, and molds and other microorganisms can grow. Also, the pH of food, a major safety component in canned food, can change as food ripens and ages. You only want to preserve food that is firm, ripe, unblemished, and free of mold.”
How to know if canned food is spoiled
NCHFP recommends all home-canned foods be stored in a cool, dark dry place, between 50° – 70° and used within a year. Label and date your jars to help keep track of time.
The organization also recommends removing ring bands from sealed jars before storing them, to make it easier to tell if the vacuum seals break. Discard the food if the seal has broken in storage.
The CDC lists these warning signs of contamination in canned food. If you see them, throw the food out:
- The container is leaking, bulging, or swollen
- The container looks damaged, cracked, or abnormal
- The container spurts liquid or foam when opened
- The food is discolored, moldy, or smells bad
Once opened, jams and jellies should be kept in the refrigerator at 40°F or lower. “Regular” — or pectin-added, full-sugar — cooked jams and jellies are best stored for up to one month in the refrigerator after opening. Examine jars regularly for any signs of mold and off-odors. Keep in mind that reduced sugar jams and jellies may deteriorate in color and texture more quickly as they lack the full preservative effects of the sugar.
Sheryl Wiser is a writer and musician who has worked extensively in the local food system.
Where to learn more about canning
Tilth Alliance and The Pantry offer classes, depending on the time of year. PCC will offer new cooking classes starting this fall, check out the class schedule for canning options. If free is your jam, Craig suggests this self-paced course from Michigan State University which covers a variety of preservation methods, and offers a self-paced and suitable guide for beginners and experienced preservers alike. WSU Snohomish County Extension’s online Preserve the Harvest classes are a great place to learn about the most recent research and changes to home preservation procedures.